Development environment
Configure where your AI agents run and how your app previews work.

The development environment is where your AI agents write and test code. Think of it as a cloud-based dev machine that Superconductor spins up for each project. Your agents clone your repos, install dependencies, and run your app—all in this environment.
If you run into any issues during dev environment setup, reach out to us—our team would be happy to get on a call and walk you through the setup for your specific project or to answer questions over email.
Do I need to set up a dev environment?
You can start using Superconductor right away without configuring a development environment. Here's what works and what doesn't:
| Feature | Without dev environment | With dev environment |
|---|---|---|
| Agents update code | ✅ Yes | ✅ Yes |
| Agents commit and push to GitHub | ✅ Yes | ✅ Yes |
| Live app previews | ❌ No | ✅ Yes |
| Agents run tests | ⚠️ Limited | ✅ Yes |
| Agents run build scripts | ⚠️ Limited | ✅ Yes |
Without a configured environment, agents can still read and write code, but they won't be able to run your app or see it in action. For most projects, you'll want to set this up.
Automatic Environment Setup
When you create a new project, Superconductor automatically kicks off Automatic Environment Setup. An AI agent analyzes your repo, figures out what packages, build commands, startup commands, and services your project needs, and suggests a complete configuration for you. For new projects, the agent automatically applies its configuration once it's validated—no manual step needed. If your project already has an environment configured, you'll review the suggestions and click Apply to Project to update it.
Automatic Environment Setup appears in the Recent Activity sidebar while it runs, so you can monitor progress from the rest of the app. It does not use workspace credits.
Getting to the setup page
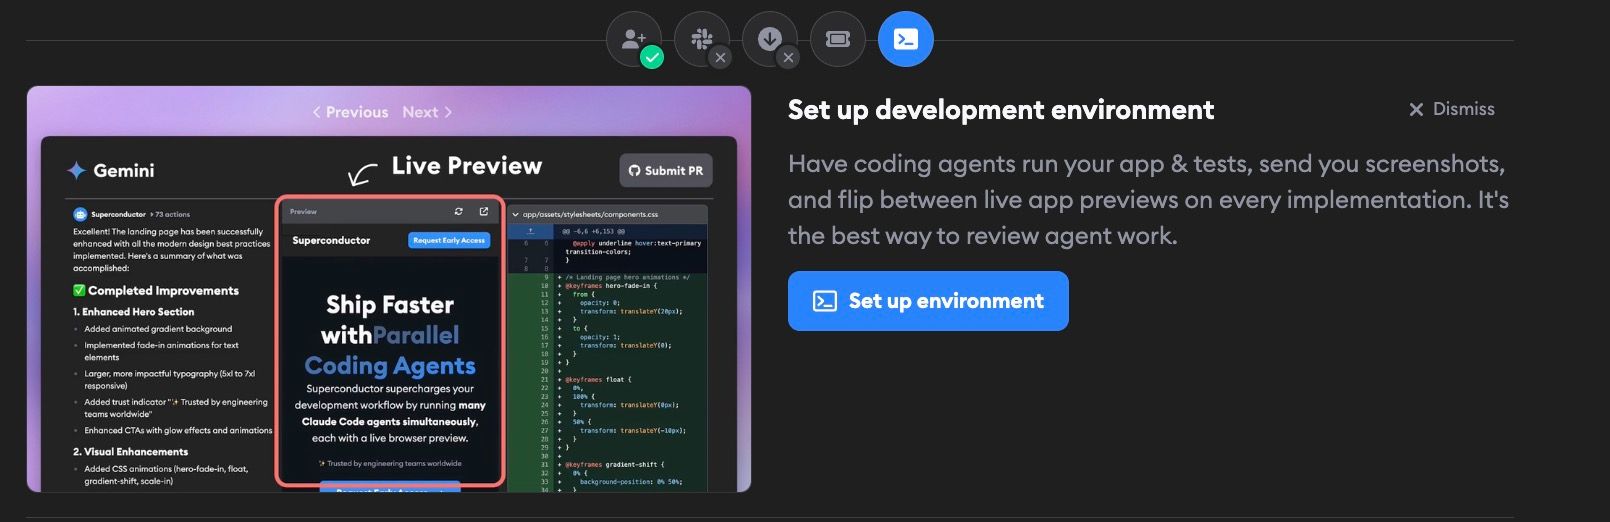
Automatic Environment Setup starts automatically when you create a project, but the agent runs in the background. To see its progress or chat with the agent, open the setup page.
The fastest way: click Set up environment in the onboarding checklist on your project dashboard.
You can also get there from Project Settings by clicking Automatic Setup in the Development Environment section.
How it works
- When you create a project (or click Automatic Setup in Project Settings), Superconductor spins up a cloud instance and runs an agent that reads your repo's code, docs, and config files.
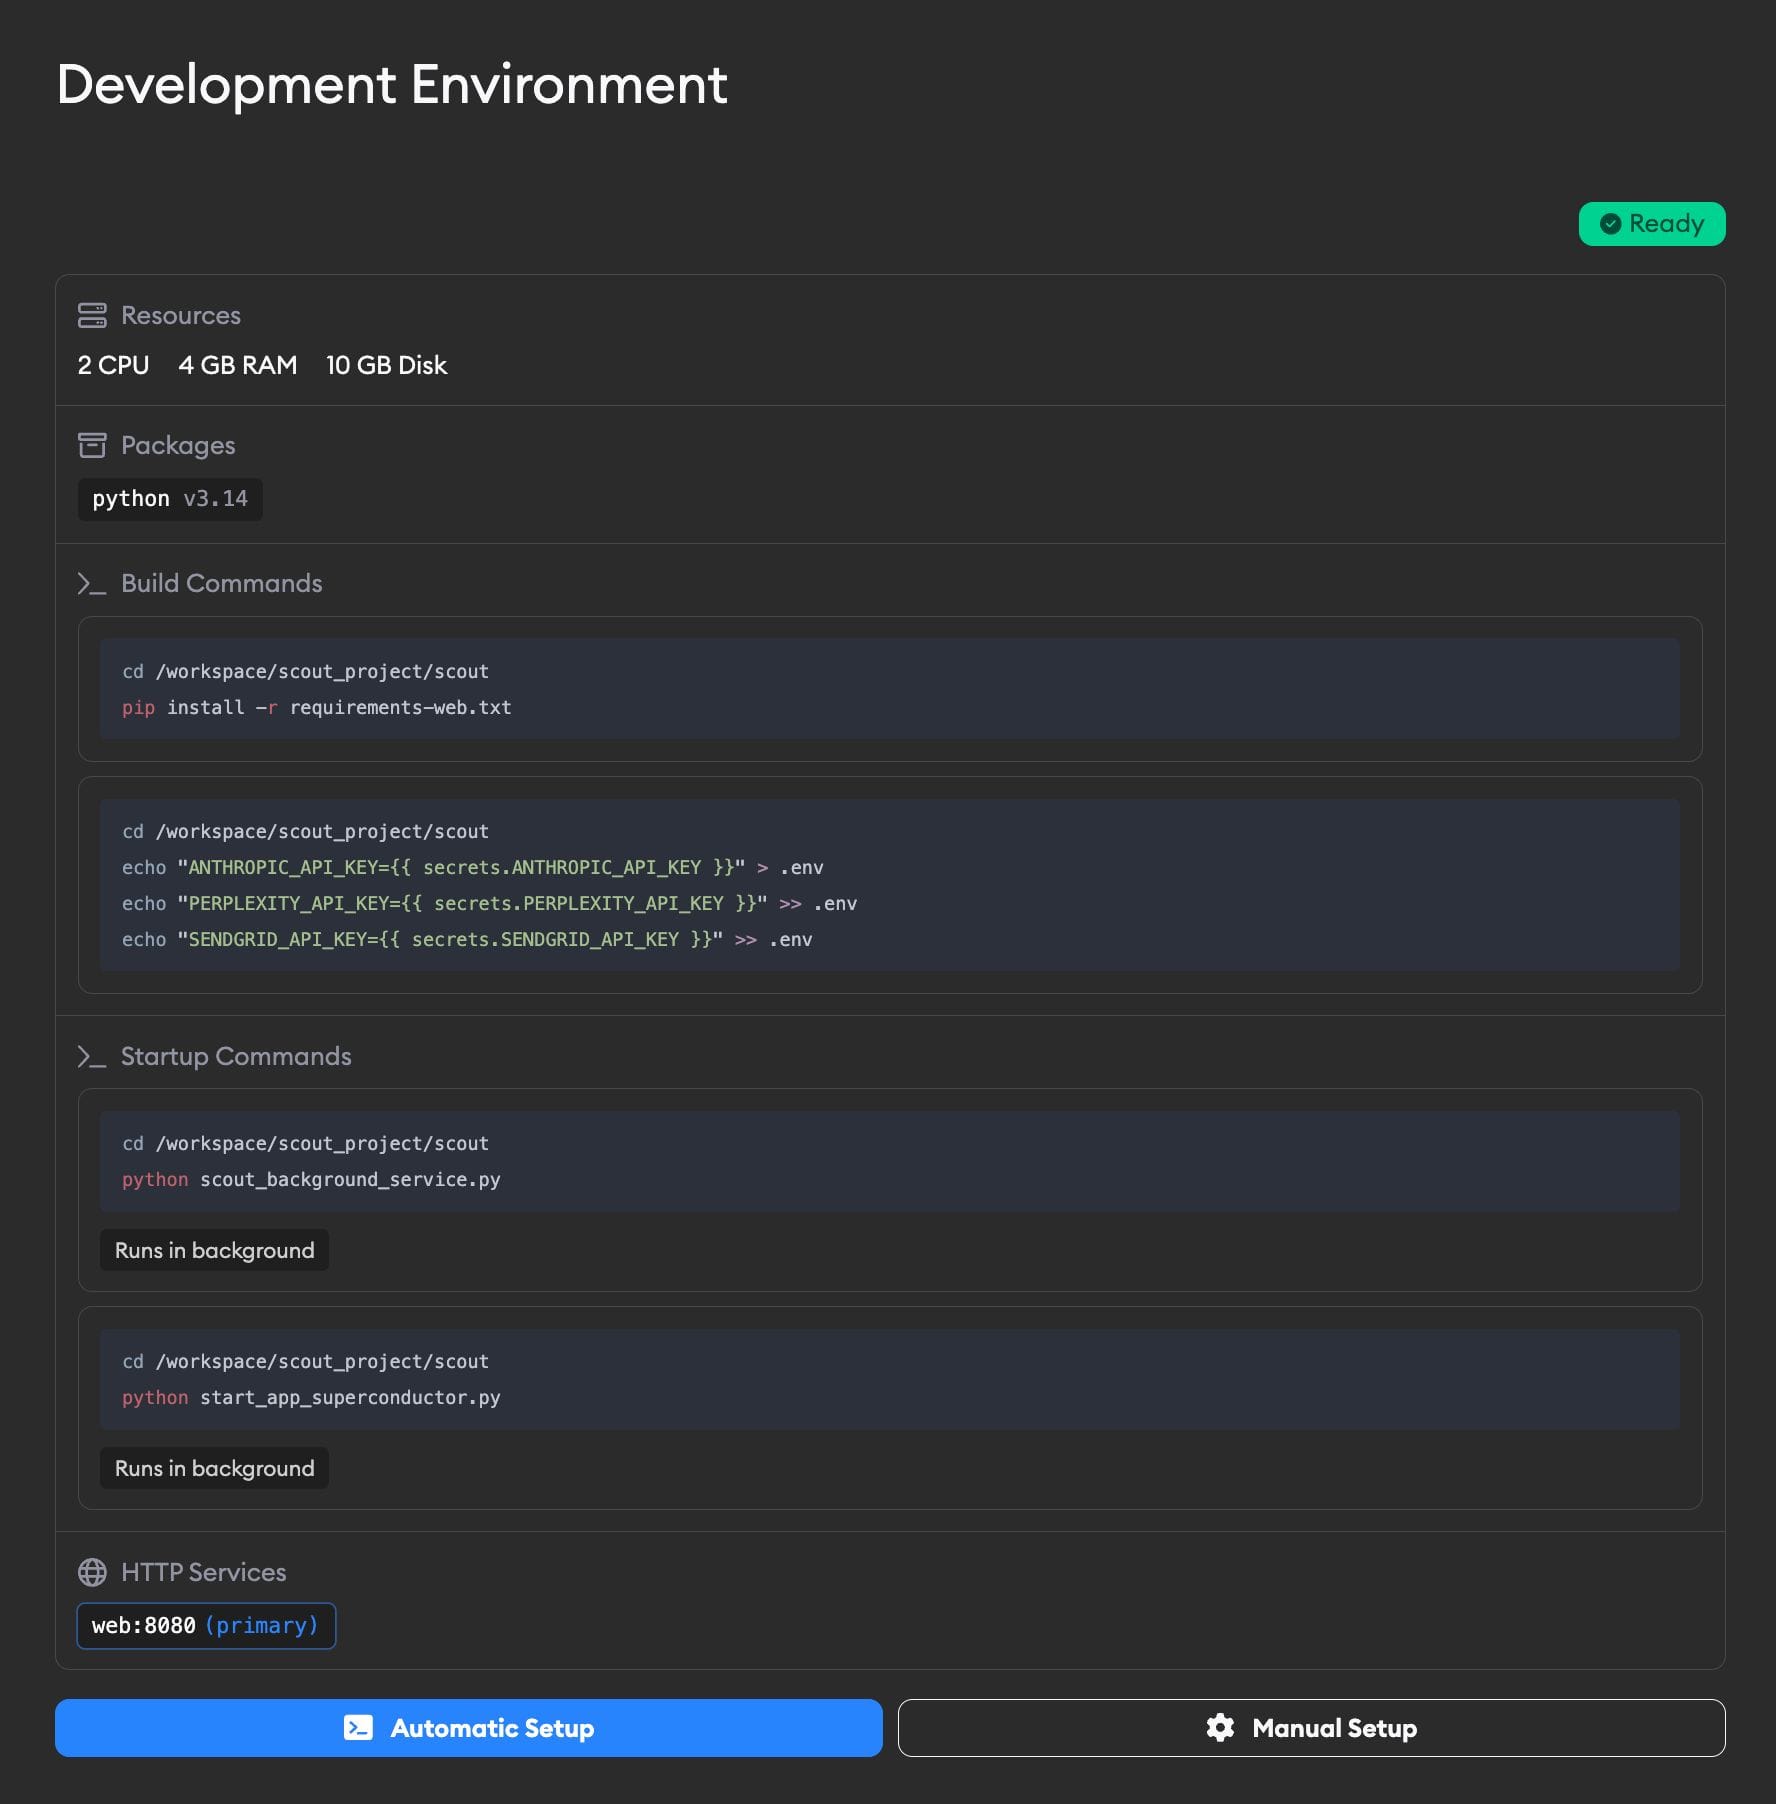
- The agent suggests a full environment configuration: packages, build commands, startup commands, secrets, and HTTP services.
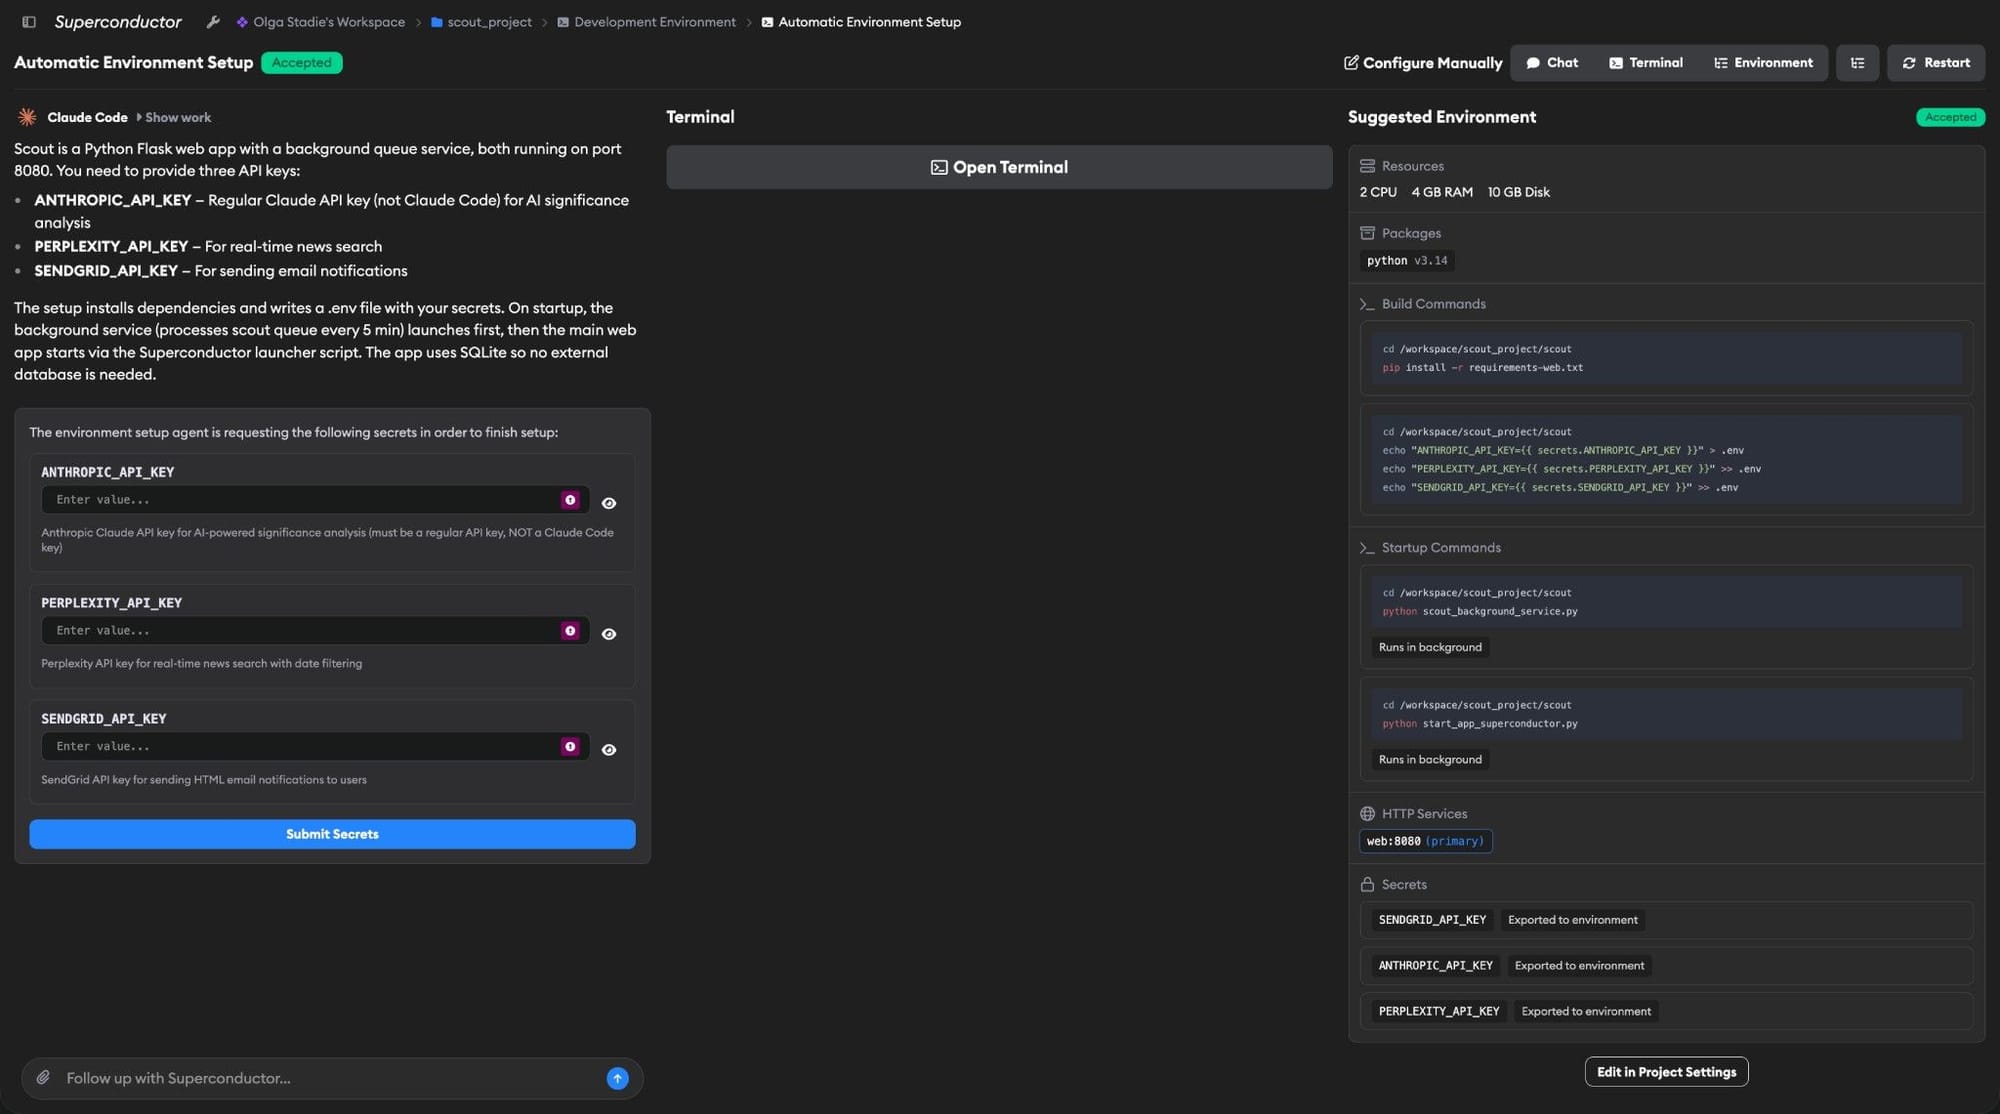
- You review the suggestions in a three-pane UI:
- Chat (left): Talk to the agent, ask questions, or request changes
- Terminal (middle): A live terminal connected to the cloud instance
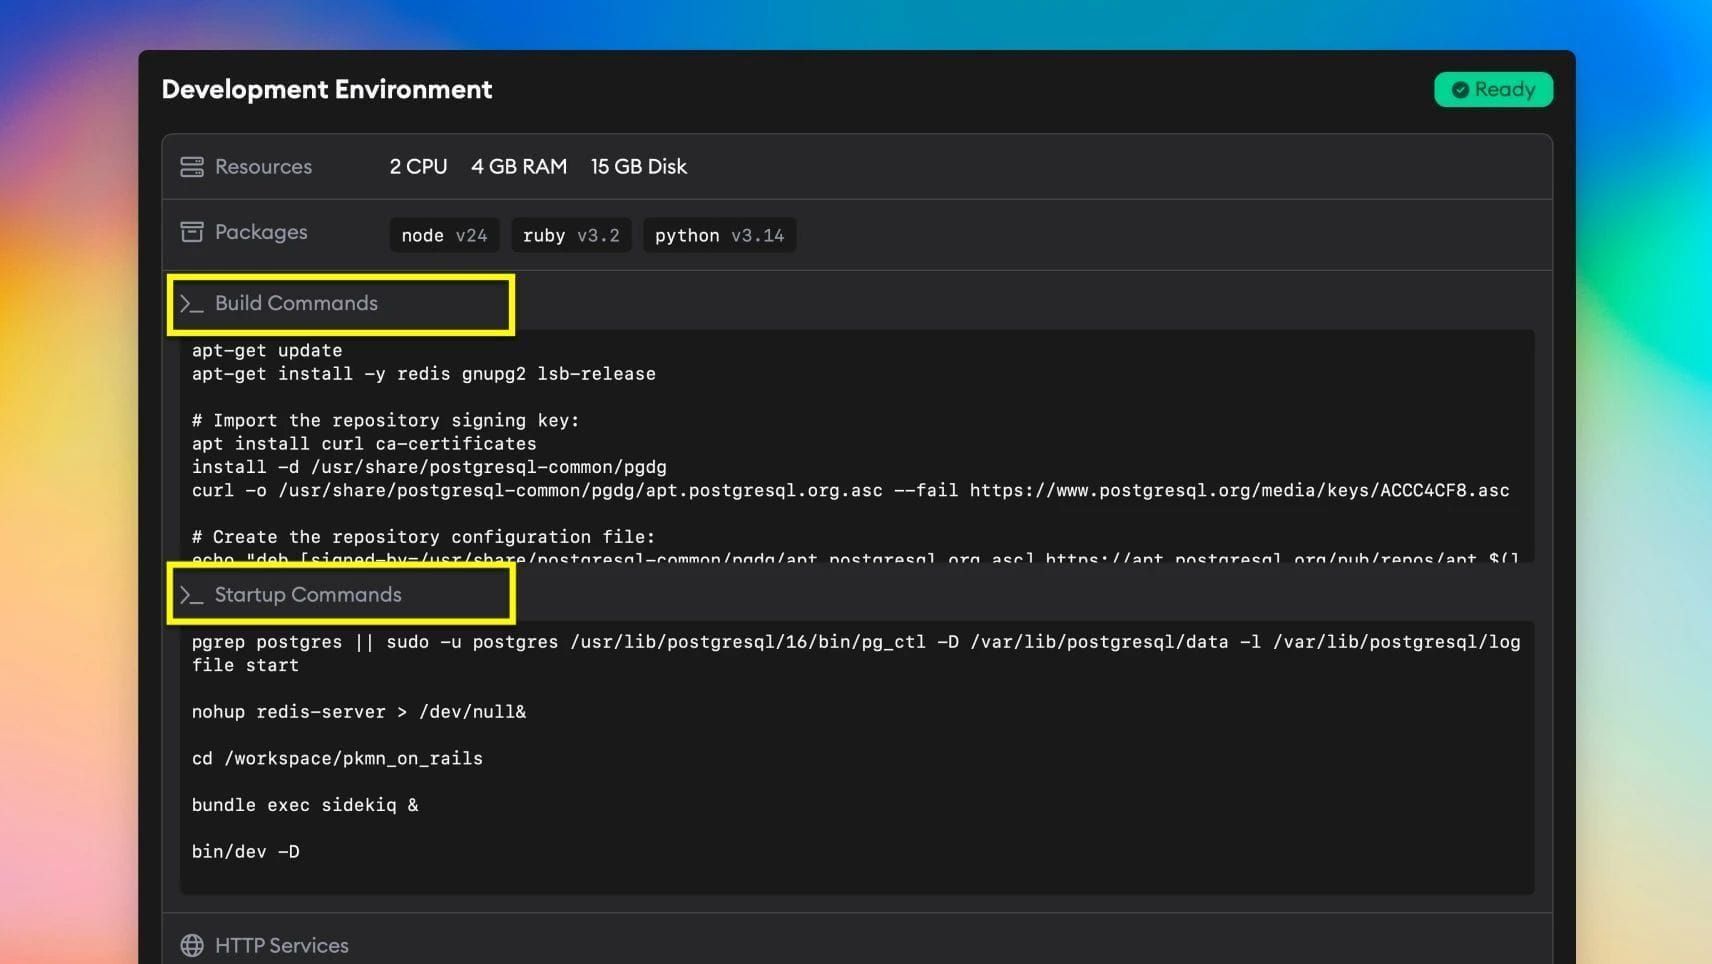
- Environment (right): The agent's suggested configuration, rendered in a readable summary of resources, packages, build commands, startup commands, HTTP services, and secrets
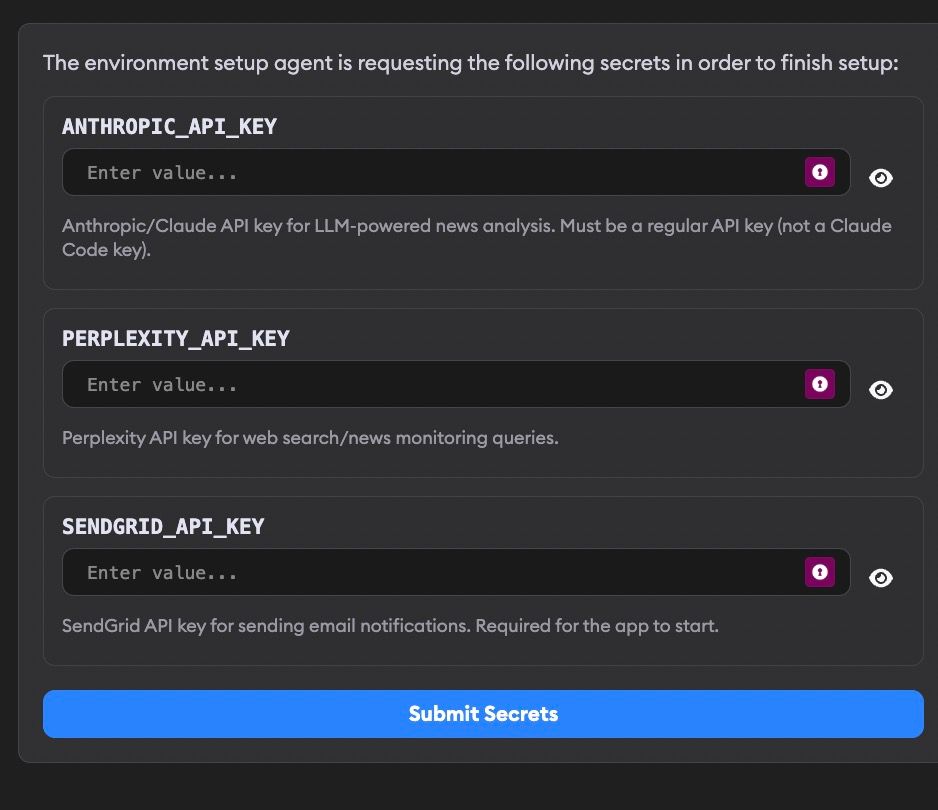
- If the Automatic Environment Setup agent identifies secrets your project needs (API keys, database URLs, etc.), it'll prompt you to provide the values through a form in the chat. The agent can detect which secrets are needed but can't guess the values. If setup is blocked waiting for secret values, you'll also get an email titled Automatic environment setup needs your help with a Provide input button that links back to the setup page.
- For new projects, the agent automatically applies the configuration once it's validated. If the project has startup commands, HTTP services, and all required exported secrets filled in, the agent first tests that the live preview works before applying. For projects that already have an environment configured, you'll see Apply to Project and Don't Apply buttons to manually accept or dismiss the suggestions.
If you'd rather skip the Automatic Environment Setup agent and configure everything by hand, click Configure Manually in the setup page header to go straight to manual configuration.
After the configuration is applied (automatically or manually), Superconductor builds an environment snapshot. Once the build succeeds, agents can start working on tickets with full access to your running app, and you'll be able to use live previews.
Sometimes the agent can start your app, but needs a small repo change to make the preview work inside Superconductor, such as allowing the preview host or relaxing iframe headers in development. When that happens, Automatic Environment Setup will add a temporary startup-command patch so previews work immediately. It will then auto-create a linked ticket in your project and launch an implementation to make the same change properly in your repo.
Which agent runs the setup?
Automatic Environment Setup automatically picks the best available coding agent based on your configured credentials.
What the agent looks for
The agent reads your repo to determine:
- Packages: Which language runtimes you need (Node.js, Python, Ruby, Docker)
- Build commands: How to install dependencies, set up databases, and build assets
- Startup commands: How to start your dev servers
- Secrets: Which environment variables need sensitive values (API keys, tokens, etc.)
- HTTP services: Which ports your app listens on, for live previews
It prioritizes existing setup scripts (like bin/setup, bin/dev, or Makefile targets) over reinventing the wheel. If your project uses Docker for development, it'll configure Docker-based commands.
Editing your environment after setup
Once the agent's suggestions have been applied, you can make further changes at any time:
- Manual edits: Click Manual Setup in the Development Environment section of Project Settings to open the manual configuration page, where you can edit commands, packages, secrets, and services directly.
- Re-run Automatic Environment Setup: Click Automatic Setup in Project Settings to start a fresh Automatic Environment Setup session. You can also click Restart from within an existing setup page if the current run got stuck, picked up stale suggestions, or you changed your code and want a fresh pass from scratch.
Older projects: If your project was created before Automatic Environment Setup was available, it won't have run automatically. If your project already has a configured environment, you'll see Automatic Setup and Manual Setup buttons in the Development Environment section of Project Settings. If your project doesn't have a configured environment yet, you'll see a Configure button that takes you to manual configuration, where you can click Automatic Setup to start Automatic Environment Setup instead.
Manual configuration
You can also configure your dev environment by hand. This gives you full control over every setting.
Getting to manual configuration settings
There are a few ways to reach the manual configuration page:
- From the Automatic Environment Setup page: Click Configure Manually in the header to go directly to manual configuration.
- After Automatic Environment Setup: Once you've applied the agent's suggestions (or if your environment is already configured), a Manual Setup button appears in the Development Environment section of Project Settings.
- Older projects: Projects created before Automatic Environment Setup was available may show a Configure button in the Development Environment section of Project Settings, which links directly to manual configuration.
The manual configuration page has two main sections: Build (one-time setup) and Startup (runs each time).
At the top of the page, you'll also find two action buttons:
- Rebuild Development Environment: Triggers a fresh environment snapshot build using your current configuration. This button is disabled if you haven't configured any setup commands, startup commands, packages, HTTP services, or secrets yet.
- Automatic Environment Setup: Opens the Automatic Environment Setup page. If you've run it before, it takes you to the existing session. Otherwise, it starts a new one.
Build settings
These settings determine how your environment snapshot is built. Changes here require rebuilding your environment.
Resources
Configure the compute resources for your environment:
- CPU: 2-8 cores
- Memory: 1-12 GB RAM
- Disk: 5-20 GB storage
Start with the defaults (2 CPU, 4 GB RAM, 10 GB disk) and bump them up if your builds are slow or running out of memory.
Packages
Select which language runtimes to install:
- Docker: Enable if your project needs containerization
- Node.js: Pick your version (20, 22, 24)
- Python: Pick your version (3.10, 3.11, 3.12, 3.13, 3.14)
- Ruby: Pick your version (3.2, 3.3, 3.4, 4.0)
Only enable what you need—more packages mean longer startup times.
Secrets
Store sensitive values like API keys securely. Use them in your commands with the {{ secrets.SECRET_NAME }} syntax.
Example:
export API_KEY={{ secrets.MY_API_KEY }}Each secret has an Export to Environment toggle. When enabled, the secret is automatically available as an environment variable ($SECRET_NAME) across all build commands, startup commands, terminal sessions, and agent executions — no manual export needed. Exported secrets are shown with an Exported to environment badge in the development environment summary.
Secrets are encrypted and redacted from build logs.
Build commands
Commands that run once when building your environment snapshot. Use these for:
- Installing dependencies (
npm install,bundle install) - Setting up databases
- Building assets
- Any one-time setup
Important things to know:
- Each command block runs in its own shell. Exports like
export API_KEY={{ secrets.API_KEY }}are only available within that block. cdinto your repo directory first—repos are cloned to/workspace/<repo-name>- To make environment variables available across command blocks and for running agents, enable Export to Environment on the secret. It will be exposed as
$SECRET_NAME.
Example build commands for a Node.js app:
cd /workspace/my-app
npm install
npm run build
Example for a Rails app:
cd /workspace/my-rails-app
bundle install
rails db:setup
Startup settings
These settings run every time an agent starts working on your project.
Startup commands
Commands that start your development servers. Each startup command has a Run in background checkbox — enable it for long-running processes like dev servers, workers, and file watchers. The last startup command always runs in the background automatically, and background commands are labeled in the development environment summary.
Each startup command block runs in its own shell. Secrets with Export to Environment enabled are available as $SECRET_NAME across startup command blocks and agent executions.
Example for a Node.js app:
cd /workspace/my-app
npm run dev
Example for a Rails app:
cd /workspace/my-rails-app
bin/dev
HTTP services
Tell Superconductor which ports your app uses so we can create live previews.
| Field | Description |
|---|---|
| Name | A label for the service (e.g., web, api, vite) |
| Port | The port your service runs on (e.g., 3000, 8080) |
| Primary | Check this for the main service to show in App Preview. Only one service can be primary—this is what loads in the preview pane by default. Other services can also be previewed using the dropdown menu in the preview pane header. |
These are the default ports for common frameworks:
| App type | Service name | Port |
|---|---|---|
| Node/Vite | web | 3000 or 5173 |
| Rails | rails | 3000 |
| Django | web | 8000 |
| Next.js | web | 3000 |
We automatically create environment variables for each service. The pattern is AGENT_{SERVICE_NAME}_HOST, where the service name is uppercased and hyphens become underscores:
AGENT_WEB_HOSTfor a service named "web"AGENT_API_HOSTfor a service named "api"AGENT_MY_APP_HOSTfor a service named "my-app"
These variables contain the hostname of your live preview URL. Use them in your startup commands if your app needs to know its external URL at runtime—for example, to configure CORS, set callback URLs, or generate absolute links.
cd /workspace/my-app
export BASE_URL=https://$AGENT_WEB_HOST
npm run dev
You can also write them to a .env.local file from your startup commands:
cd /workspace/my-app
echo "BASE_URL=https://$AGENT_WEB_HOST" > .env.local
npm run dev
Getting your app to work in an iFrame
Some frameworks need extra development-only configuration before the preview will load inside Superconductor. In particular:
- If your framework restricts allowed hosts, add
AGENT_<SERVICE_NAME>_HOST - If it sends
X-Frame-Options: DENYorSAMEORIGIN, remove that header or replace it with a CSPframe-ancestorsrule that allows Superconductor - If auth works in a normal tab but not in the embedded preview, set cookies to
SameSite=NoneandSecurein development
See Framework examples for code snippets.
Framework examples
These examples assume you defined a primary HTTP service named web or rails, so Superconductor provides AGENT_WEB_HOST or AGENT_RAILS_HOST.
Rails
Rails apps commonly need both host authorization and iframe-friendly headers. A typical development setup looks like this:
# config/environments/development.rb
if ENV["AGENT_RAILS_HOST"].present?
  agent_host = ENV["AGENT_RAILS_HOST"]

  config.hosts << agent_host

  # Route helpers like users_url
  routes.default_url_options = { host: agent_host }

  # Mailers and other code that generates absolute URLs outside a request
  config.action_mailer.default_url_options = { host: agent_host }
  config.action_mailer.asset_host = "https://#{agent_host}"

  # If you use Action Cable / Turbo Streams in preview
  config.action_cable.url = "wss://#{agent_host}/cable"
  config.action_cable.allowed_request_origins = ["https://#{agent_host}"]

  config.content_security_policy do |policy|
    policy.frame_ancestors :self, "https://superconductor.com", "https://*.superconductor.com"
  end

  config.action_dispatch.cookies_same_site_protection = :none
  config.assume_ssl = true
end
Node.js with Vite
Vite often needs the preview host added to allowedHosts. If you use Helmet or another security middleware, also allow Superconductor in frame-ancestors.
// vite.config.ts
import { defineConfig } from "vite";

export default defineConfig({
  server: {
    host: "0.0.0.0",
    allowedHosts: [
      process.env.AGENT_WEB_HOST,
    ].filter(Boolean),
  },
});
// Express + Helmet example
app.use(
helmet({
frameguard: false,
contentSecurityPolicy: {
directives: {
frameAncestors: ["'self'", "https://superconductor.com", "https://*.superconductor.com"],
},
},
}),
);Next.js
Next.js uses allowedDevOrigins to allow requests to dev-only assets and endpoints from a hostname other than the one the dev server started with. If you set restrictive security headers, also allow Superconductor in frame-ancestors.
// next.config.js
const agentHost = process.env.AGENT_WEB_HOST;

/** @type {import('next').NextConfig} */
const nextConfig = {
  allowedDevOrigins: agentHost ? [agentHost] : [],
  async headers() {
    return [
      {
        source: "/:path*",
        headers: [
          {
            key: "Content-Security-Policy",
            value: "frame-ancestors 'self' https://superconductor.com https://*.superconductor.com;",
          },
        ],
      },
    ];
  },
};

module.exports = nextConfig;
If you already set CSP in middleware.ts, proxy.ts, or another reverse proxy, update the existing frame-ancestors rule there instead of adding a second CSP header.
Django
Django usually needs the preview host added to ALLOWED_HOSTS, plus iframe and cookie settings for embedded auth flows.
# settings.py
import os

agent_host = os.getenv("AGENT_WEB_HOST")

if agent_host:
    ALLOWED_HOSTS.append(agent_host)
    CSRF_TRUSTED_ORIGINS.append(f"https://{agent_host}")
    X_FRAME_OPTIONS = "ALLOWALL"
    SESSION_COOKIE_SAMESITE = "None"
    SESSION_COOKIE_SECURE = True
    CSRF_COOKIE_SAMESITE = "None"
    CSRF_COOKIE_SECURE = True
If you use django-csp, prefer a CSP frame-ancestors rule over relying only on X_FRAME_OPTIONS.
Building your environment
After configuring your settings, click Save Development Environment. This triggers a build.
Tracking build progress
Watch the build log in the Terminal pane on the right side of the Dev Environment Edit page or at the top of the Dev Environment Edit page. You'll see:
- Starting - Environment is spinning up
- Running - Each command executes with a spinner
- Finalizing - Snapshot is being saved
What success looks like
When the build completes successfully, you'll see a green checkmark at the top of the Dev Environment Edit page and the message:
"Development environment built successfully!"

Once built, agents can start working on tickets immediately.
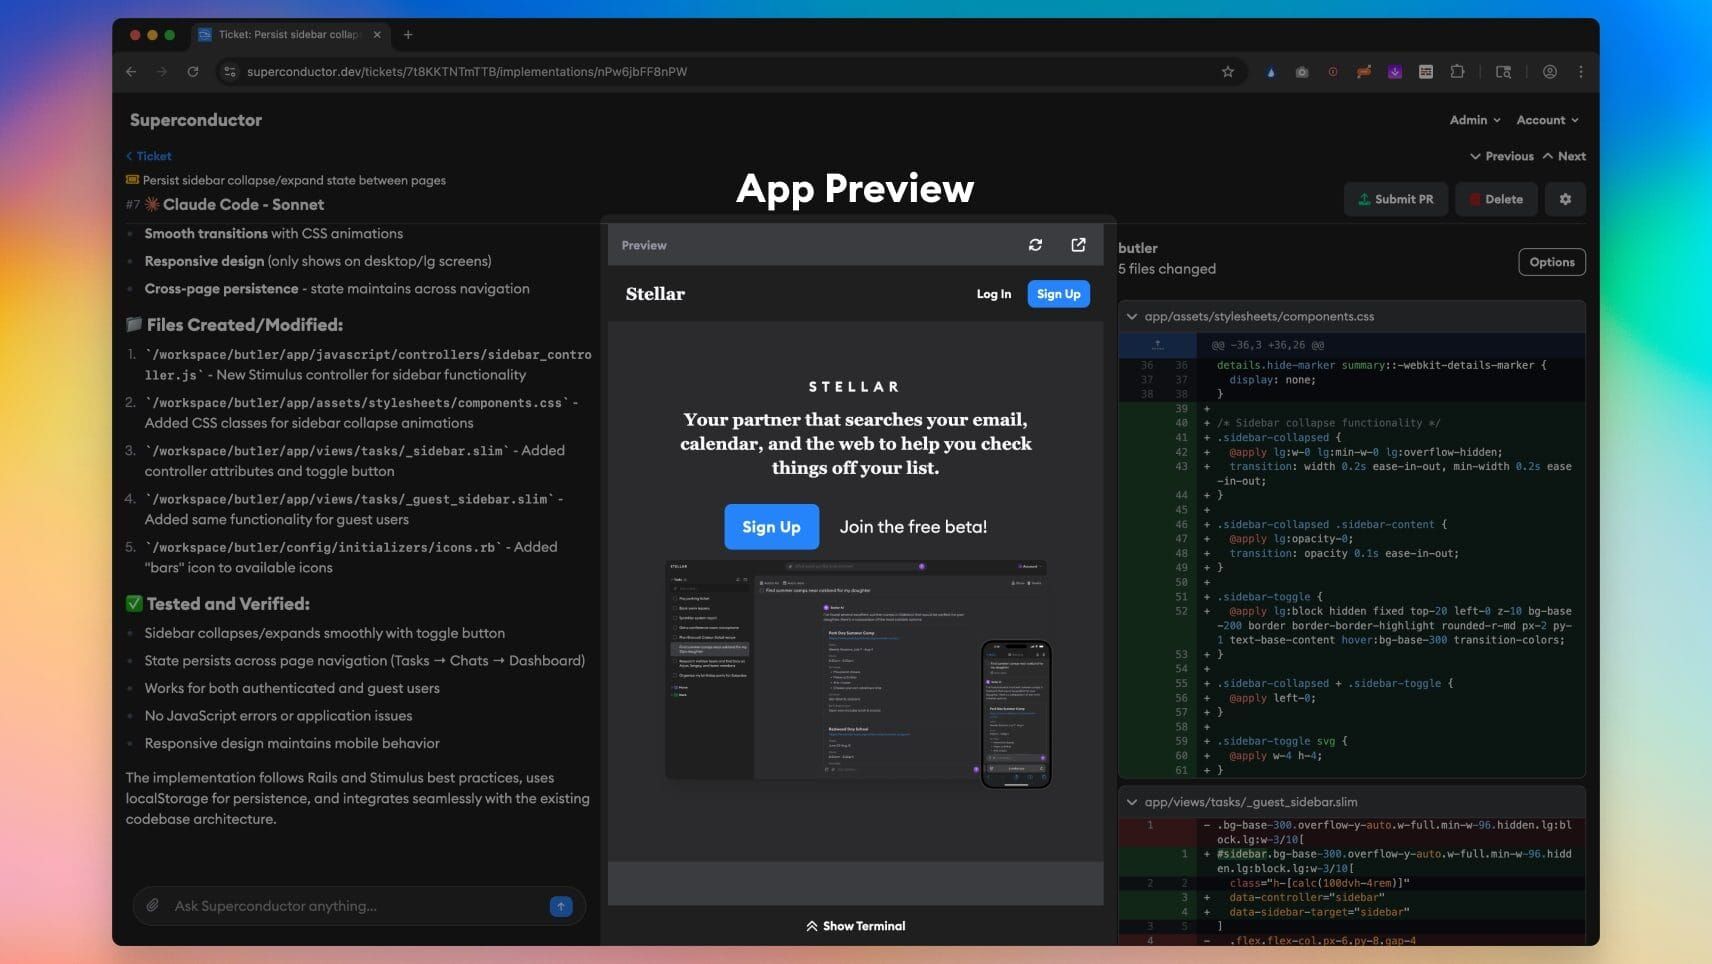
What a running preview looks like
When you launch a new implementation, your startup commands automatically run. Once they complete, your live preview loads.
You can see the live App Preview above the terminal:
Troubleshooting
Build command failures
If a build command fails, you'll see the error in the terminal pane with:
- The command that failed
- Exit code
- STDOUT and STDERR output
To fix:
- Update your build commands in Settings
- Click Rebuild Development Environment (or Save Development Environment if you made changes)
Common issues:
- Missing dependencies: Make sure you're installing everything your app needs
- Wrong directory: Remember to
cd /workspace/<repo-name>first - Missing secrets: Check that all required secrets are configured
- Framework blocks the preview host or iframe: Add the relevant
AGENT_<SERVICE_NAME>_HOSTand iframe settings from Framework examples
Startup command issues
Startup commands run each time an agent starts. The preview loading screen shows each command's progress and output in real time, making it easy to spot failures.
If a command shows a red "Timed out" indicator, it exceeded the five-minute timeout. Try simplifying the command or splitting it into smaller steps.
For further debugging:
- Go to any Ticket Implementation in your project
- Click Show Terminal to run the startup commands manually
- Look for errors in the output
Common issues:
- Port already in use: Make sure you're not trying to start multiple servers on the same port
- Wrong port in HTTP services: Double-check the port matches what your app actually uses
- App crashing on startup: Check the command output on the loading screen or in the terminal
- Command timeout: A startup command took longer than five minutes. Consider optimizing or splitting it.
Previews not loading
See Preview not loading? in the Live Preview docs for troubleshooting steps.
Tips for success
- Start simple: Get a basic build working before adding complexity
- Test locally first: Make sure your setup commands work on your own machine
- Use the terminal: It's your best friend for debugging
- Check the logs: The terminal shows exactly what's happening
- One thing at a time: Add commands incrementally and rebuild to verify each step
Need help?
If you're stuck, reach out to us. Our team would be happy to get on a call and walk you through the setup for your specific project or to answer questions over email. Include:
- Your project name
- What you're trying to do
- Any error messages you're seeing